On-site Residual Fuel Compatibility Tester
31 กรกฎาคม 2565
ผู้ชม 162 ผู้ชม
Summary
Thermal Oxidation Stability of Aviation Turbine Fuels, ASTM D3241 is universally used by the industry to measure high temperature stability of aviation turbine fuels. The ASTM D3241 is required to be run on every batch of jet fuel produced according to ASTM D1655, D7566 or DEF STAN 91-91 specifications. In this test method, the fuel is pumped through heater tube at fixed flow rate and during a specified period of time. The fuel is pass or fail rated according to the amount of deposit formed on the heater tube at a specified temperature. Traditionally, the amount of deposit on the tube is rated visually against a reference color scale. The proper rating requires significant experience and expertise. However, operator capabilities vary, so evaluation of color can be quite subjective.
Many articles have been published on the fact that color does not provide real information on the thickness and volume of deposits, parameters which are far more meaningful for characterizing jet fuels for users and suppliers. The aviation fuel industry found that one of the most crucial stages of this test method is an objective analysis of deposit produced on the heater tube.
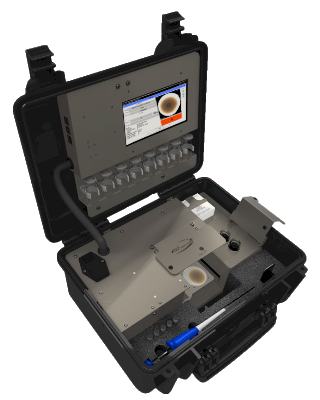
A new instrumental method of quantitative measurement of tube deposits has been developed by AD Systems, in which the thickness of the deposit is accurately determined by an automatic instrument, reducing test subjectivity. The innovative DR10 instrument uses an interferometry technique (ITR) for precise measurement of deposit thickness in nanometers. This stand-alone compact instrument can be easily installed in any location in minutes. The operation is based on a powerful light source, a spectrometer with fiber optic probe and specially designed application software.
The DR10 test is simple and straightforward. The heater tube is prepared according to ASTM D3241 test procedure and is then placed in the test chamber of the DR10. Using an intuitive graphical interface with touch screen panel, the operator enters sample information and starts a tube scan. Specific light is emitted and directed onto the surface of the heater tube. The reflected light is collected and the interference created by the deposit is monitored by the spectrometer. The software analyzes the interference and calculates the deposit thickness. Precise thickness measurements are taken at 1,200 points along and around the tube surface. A detailed test report is ready in less than 15 minutes.
The DR10 test report provides a 3-D profile of the deposit distribution on the tube surface. The software automaticaly detects and reports the Standard Spot value which is the mean deposit thickness of the thickest 2.5 mm2 area as defined in ASTM D3241. The average and the maximum thickness deposit values, as well as the calculated total deposit volume are reported. For complete test traceability, the DR10 report is tagged with the heater tube serial number picture taken by the built-in camera.
Absolute measurement of deposit thickness
Quick, accurate and objective rating
Push of a button operation
Very compact design
Rigid construction
Application
Refineries
Special fuel
Pipeline and terminals
Military fuel testing
Jet fuel testing
The operation is based on a powerful light source, a spectrometer with fiber optic probe and specially designed application software.
The reflected light is collected and interference created by the deposit is processed by the spectrometer. The software analyzes the interference fringes and calculates the deposit thickness. The full scan of tube surface on 1,200 points is completed in less than 15 minutes.
1 - The heater tube is prepared according to ASTM D3241 test procedure and is then placed in the chamber of the DR10 Deposit Rater.
2 - The tube is then placed in the Test chamber of the DR10.
3 - All samples details are entered and the operator presses the START button.
4 - The result is reported after 15 minutes.
Specification
| Reported results | Measurement range |
| Average thickness | 10 to 1200 nm |
| Maximum thickness | 10 to 1200 nm |
| Maximum thickness on 2,5 mm² area | 10 to 1200 nm |
| Deposit volume | 0 to 0.5 mm³ |
| Technical Points | Description |
| Test duration | Less than 15 minutes |
| Number of measurement points | 1,200 points |
| Parameters saved with a test result | Sample type Sample ID Date and Time Operator name Test Rig Identification used for the Thermal Oxidation Stability of Aviation Turbine Fuels test Thermal Oxidation Stability of Aviation Turbine Fuels temperature Heater tube serial number Comments X and Y Coordinates for the standard spot localization Calibration information (tube serial number + date of calibration) Instrument serial number Software version |
| Results storage | Up to 100 000 results |
| Results storage | Up to 100 000 results |
| LAN connectivity | Ethernet port RJ45 |
| Printer output | Serial port (printer is optional) |
| Data output | USB(2), Ethernet |
| Dimensions | W x D x H (mm): 250 x 160 x 290 W x D x H (inches): 10" x 16" x 12" |
| Weight | 10kg (22lb) |
| Electrical | 112 to 230V - 2A - 50/60Hz |


